Tuesday, July 12, 2011

Air Force Patch Cake

Recently I was asked to make a cake for an Air Force change of command ceremony. For some reason my friend who ordered the cake trusted me enough to give me free reign in it's design. :) It stressed me out a little bit, but I was excited to be able to try something I hadn't done before.

After mulling over the design of the cake for a while, I decided it would be fun to sculpt the detachment's patch:
 
The first thing I did was scan the badge and use my copier to enlarge it. Then I set to work on coloring the fondant I would need. This proved to be harder I'd anticipated. I live on an island without a lot of access to cake decorating supplies. I wasn't able to get the fondant in the colors I needed, so I had to do the best I could with white fondant and food coloring. This resulted in the colors being more muted than I would have liked. 

After carving out the shape of the patch, I did a quick icing job. I didn't have to worry too much about getting it super smooth or covering every bit of the chocolate cake since I was planning to cover it in a colored fondant.

Here's the final product:

I'm really pleased with the way it turned, I just wish I'd been able to get the colors more true to the colors of the patch.

Monday, December 6, 2010

Mission: Space

     When my son decided he wanted a space party for his 4th birthday, I knew my mission was to make him and awesome space shuttle cake.


     This was actually a pretty simple cake to construct. After mixing up the batter, I poured it into a jelly roll pan. I’m not sure of the exact size of the pan, but I know it’s a little bigger than my 11x15 sheet pans. The great thing about using sheet pans for making cakes is that the baking time is significantly reduced; it usually takes me about 20-25 minutes. The pans I use for this are found in the restaurant supply section of many Costco stores, they look like big, rimmed cookie sheets. I love these pans and I use them for tons of stuff! They look something like this:
     After I baked and cooled the cake, I cut it into identical rectangles using a template cut out of cardboard. I filled the cake with peanut butter butter cream and mini chocolate chips and then put it in the fridge to chill for a bit. The great thing about making a space shuttle cake is that there’s not much carving involved since it’s pretty rectangular. I contoured the top edges a little bit and carved the nose then crumb coated it all. The cake went back into the fridge to chill for a bit before I put fondant on.

     After I applied the fondant, all I had to do was make some lines on the cake and then use black fondant for windows, accents, etc. I cut out the wings and stabilizer the night before the party and placed them on a cookie sheet line with wax paper. I left them in a cool oven with the light on overnight. (I was surprised at how warm that light can make the oven!) I put these pieces on right before the party. I also used food markers to do some of the accents. I really wish there was some way to make it easier to write on a cake; my handwriting on the side is my least favorite part of this cake!

     I was pleasantly surprised by the final result even though there were some things I wish I had done differently. I just wish I’d gotten a better picture of the cake, but with all the party craziness going on, I guess I’m lucky I managed to get any pictures at all!


Tuesday, November 2, 2010

Guinness!!

My husband's birthday was last month and even though he'd rather have pumpkin pie for his birthday, I like to make a cake or cupcakes for him to take into work. I guess it's sort of like sending cupcakes to school with a kid.  Haha!  :)

A couple years ago, I made this Chocolate Stout Cake for St. Patrick's Day and I though it would be fun to make it into cupcakes this year for his birthday. For some reason guys really seem to like things that have beer in them, are cooked in beer, taste like beer, look like beer, etc. so I was hoping these cupcakes would at least be a hit with the guys in the office.

The day I went shopping for cupcake liners, there were no plain or non-Halloweenish ones to be found so I used some nut cups I had sitting around. If you're planning to use nut cups for making cupcakes, make sure they are not lined with wax.  The wax lined ones are not suitable for baking.  Another option are paper souffle cups. One nice thing about using these is that you can just line them up on a baking sheet and put them in the oven; it enables you to bake more cupcakes at once.
It can be difficult to get the paper off to eat the cupcake, so I cut a small slit in each cup before filling. If you look closely at the pitcure below, you can see the small cut.

Since this was only the second time I had baked in these cups, I was worried they would bake up too high and spill over. I filled them about halfway and they baked up just right. I like my cupcakes to bake up with a flat top, it makes for easier decoration.

This recipe makes a huge amount of batter since it is for a 3 layer cake. I baked 22 regular cupcakes (I know it's a strange number, but there were only 22 cups in my 24 pack...), 24 mini cupcakes, 6 little pumpkin shaped cakes and an 8-inch cake. Thank goodness this cake is good, we ate it for about a week!  :)
Since I was only sending the cupcakes and mini cupcakes into the office, I concentrated my decoration efforts on those and used two frosting techniques. When the ganache was still warm, I dipped the tops of the mini cupcakes in and then stuck a large pumpkin sprinkle on top.
For the regular size cupcakes, I went with the traditional swirl and then topped them with sprinkles.  I found sprinkles that just happened to be in the colors of my husband's alma mater. Go Dawgs!!! 

By the way, they were a huge hit, not only at the office but also with all the friends we were able to share with!
Sunday, August 15, 2010

Home Run!!!!

Lately I've been feeling the need to bake....A LOT!!!  So, when my husband's office announced they were having a softball game followed by a potluck, I quickly got to work planning what to make. I like to take cupcakes to potlucks because they are easier to serve than cake, so I knew I'd be making some sort of yummy cupcake.  After checking out some ideas on CakeCentral, I knew just what I wanted to do....chocolate cupcakes with buttercream "grass" topped with a fondant softball. 

I've been watching a lot of cake shows and cupcake shows and I've been intrigued by their use of fillings in cupcakes.  I'd never tried before so I figured I'd give it a shot. My original thought was to fill them with whipped ganache but I was too impatient to cool and whip the ganache so I just went with lukewarm ooey-gooey ganache instead. I've seen many people using apple corers to create a hole for the filling; I didn't have one of those so I used a bismarck tip. I think the bismarck tip worked extremely well for the filling I was using, it wouldn't work so well if you wanted to use a chunky filling. Using the bismarck tip, I was able to insert the ganache into three separate holes rather than one larger hole; this ensured there was ganache throughout.

These cupcakes were AMAZING; it was like having a truffle inside your cupcake.  I'm definitely looking forward to working with more fillings for cupcakes.

The finished product:


I've mentioned a few cake shows in my posts, here are a few I like:

Did I forget any?

Also, I just heard that Bravo is going to take Top Chef to another level with Top Chef: Just Desserts.  I don't know how much cake will be involved, but I'm really excited for this show!

Friday, August 6, 2010

Vow Renewal

Some good friends of ours recently renewed their vows and asked me to make the cake for their reception/going away party.  Other than telling me which flavors they wanted and what colors the decorations were, they left the design up to me.  Since they were getting ready to leave Maui, I decided a tropical themed cake was a must. I headed to my favorite website, CakeCentral, to look for some design inspiration. I took some ideas from a few different cakes and came up with an idea of what I wanted; visions of plumeria, bamboo and teal/aqua filled my mind. 

After the baking and trimming were done, I filled the cakes:

Then it was time to start frosting.  I forgot to use my cake icer tip, so icing the sides was more difficult than it needed to be, but I still got it all covered.

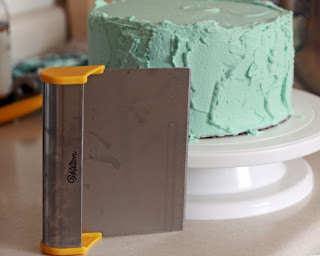
Notice how I made sure the frosting went all the way to the edge of the cake board, doing this gives you a guide when you use a spatula or other tool to smooth the sides. The next picture shows one of my favorite icing tools, the Wilton Baker's Blade, this blade is great for smoothing the sides of a cake.

Unfortunately, the odds were stacked against me when I started trying to smooth the cake. I had forgotten that the sun beats on my kitchen wall all morning making it super hot and that the AC doesn't work all that well in there.  I iced and scraped and smoothed and re-iced and re-scraped and re-smoothed over and over for about an hour before I finally decided this cake was never going to be smooth.  I decided I'd go for the textured look and just say it was supposed to "represent the ocean"! :)  You can totally do that with art, right?  Haha!

I had some other tricks up my sleeve, so I wasn't too worried about the texture.  (My husband would probably disagree since I asked him about the texture until the very minute we actually got to the party!) Remember when I said that my visions included plumeria and bamboo?  Well, these were all handmade.  I sculpted plumeria out of gum paste and bamboo out of fondant.

This was my first attempt at the gum paste plumeria and I learned some tricks in the process, but overall they turned out well.


Even though it wasn't exactly what I had originally pictured, I think the cake turned out nicely; everyone at the party loved it and there were only a few pieces left when the night was over!

Sunday, May 30, 2010

Birthday in Paradise

Last week I received a call from one of my husband's colleagues asking if I would do a cake for his wife's birthday.  I love getting the opportunity to make someone's birthday extra special, so I of course said yes!  Not to mention, the birthday girl is a dear friend of mine and I know she LOVES my cake!  :)

Other than the fact that the cake had to have lots of icing (the birthday girl's favorite part of the cake), I was pretty much given free reign over the design.  I've never been very good at the typical birthday buttercream roses, so I turned to my favorite cake website, CakeCentral, for ideas.  I quickly decided that I wanted the cake to have a tropical feel since this is the last birthday that my friend will be celebrating in our beautiful island paradise before she and her family move back to the mainland!

The CakeCentral photo galleries gave me a ton of inspiration, but given the fact that we have limited access to cake supplies here on the island and that the cake only needed to be big enough for her family of five, I had to scale back some of the grand ideas I had.  Luckily, I stumbled upon these instructions on making tropical flowers using buttercream.  Making these flowers was super simple and the results are great! 

I keep forgetting to adjust my butter and crisco amounts to compensate for the crazy humidity here in the islands, so my icing was a little softer than I would have liked.  I think a stiffer icing would have made the flowers look even better.  Also, at first I was little unsure about the color combination, but it grew on me after a while.  I think it gave it just the right amount of "tropical flair."

What do you think?


Here's a closer look at the flower:

I spoke with my friend today and she loved the cake; she's down the last piece or so of cake and she's rationing it. Haha!  I'm glad I was able to help her celebrate her last tropical birthday!

Thursday, May 20, 2010

Tea Pot

For the last few months, I've been planning an amazing birthday tea party for my baby girl. Let's be honest, she's not really a baby anymore, she just turned 5. To me she will always be my baby girl! :)

Part of the tea party planning was figuring out what kind of cake to make. I had grand plans of a topsy-turvy concoction with a tea cup sitting off-kilter on the top complete with tea splashing over the side of the cup. That all changed when I asked the birthday girl what she wanted and she said two words: tea pot. My grand plan flew out the window and I got to work figuring out how to construct the cake she requested.

After browsing the galleries at CakeCentral.com, I came up with my design. I baked a ten-inch round cake and covered it with buttercream. On top of this, I placed a fondant "tablecloth" and on top of that a tea pot made from cake.

Rather than trying to sculpt a tea pot from round cakes, I baked up some cake in bowls. My bowls are stoneware so they are oven safe. Before putting bowls in the oven, check to make sure they are oven safe. Here is a picture of the bowl I used:
I liberally applied some homemade cake release solution to the bowls and inserted a well-greased rose-nail upside down in the bowl before pouring in the batter. I let the caked bake for about 45 minutes before checking on them and to my surprise, they were almost done.

When the cakes were cool, I put them together with a thin layer of buttercream in the middle. After applying a thin layer of buttercream and chilling the cakes for a while, it was time for the fondant. I had some issues with the fondant, mostly because of the shape of the tea pot. Every time I would try and get the fondant to come back down to the bottom of the pot, it would start to tear! Either that or my fingernails would poke a big hole in it! (Note to self: Remember to cut fingernails super short before working with fondant!) I finally got the fondant to cover most of the cake successfully and used a few tricks to cover up the mistakes! :) Here's a picture of the cake:


The purple band around the bottom covers up some mistakes. The spout, handle, and lid are all made from gumpaste. Handle and spout were free-handed and have floral wire inside to connect them to the cake.  The lid was molded from the inside of another lid I have.